1. Installation
WooCommerce Shipit is installed like any other WordPress plugin.
- Download
wc-shipit.zipfrom the download link in the order confirmation - Go to
WordPress admin > Plugins > Add new > Upload Plugin - Select
wc-shipit.zipand clickInstall Now - Activate the plugin once it’s uploaded
2. Settings
Settings are located in WooCommerce > Settings > Shipit.
| Mode | Testing or production. Test environment has different credentials, please see below. |
| API Key | API Key, can be found by logging into Shipit |
| API Secret | API secret, can be found by logging into Shipit |
| Add tracking link to the order completed email | Does the plugin add tracking link to the WooCommerce’s order completed email |
| Contents | Description about package contents, e.g. ”electronics” or ”clothing” |
| Sender | Contact details of the sender |
Note! In order to use the plugin you will need to have a credit account with Shipit. Shipments are paid either by prepayment / wallet or by invoice. Shipit will provide more information about credit accounts.
2.1 Test credentials
The following credentials can be used for testing.
Note! Only certain shipping methods are available in the test environment. If you’re getting error message about missing license, unavailable service or invalid sender ID, it means that the shipping method is not available in the test environment.
Mode: Testing
API Key: CyL4/bhFJTWXJkti
API Secret: ozW1uIVxD+!N!+.)NWfQ?i<$8>f6h5+Z
3. Shipping methods
Shipit provides two kinds of shipping methods:
- Shipit with agent search – for shipping methods with pickup location search
- Shipit without agent search – for shipping methods without pickup location search (e.g. home delivery).

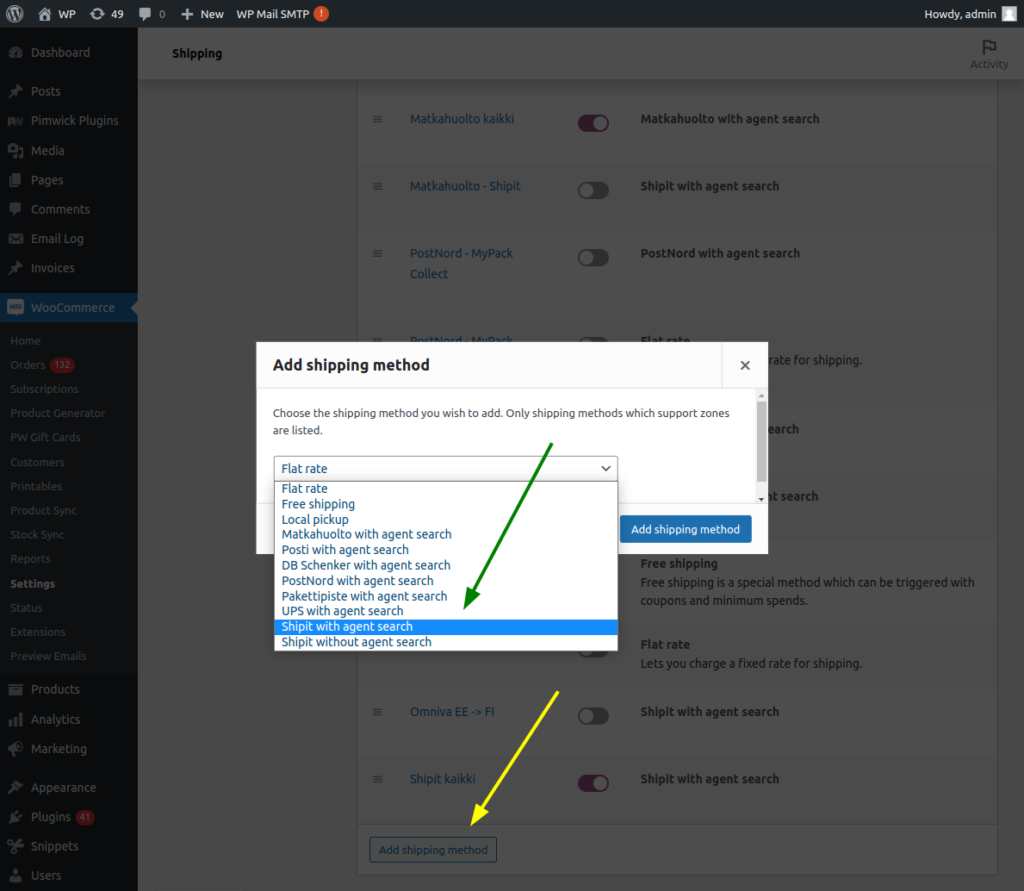
Shipping method settings can be found in WooCommerce > Settings > Shipping.
- First create a shipping zone, for example Estonia
- Open the created zone and click
Add shipping method - Select type of the shipping method (usually
Shipit with agent searchorShipit without agent search) - Change title of the shipping methods (e.g. Omniva Pickup Point Delivery), enter price and other settings and click
Save - Repeat steps 1 – 4 for all shipping methods you want to provide to your customers
Shipping methods can be linked to Shipit’s services once they’re created. With linking correct shipping method is selected when shipping label is being created. Linking can be done at WooCommerce > Settings > Shipit > Shipping methods.
4. Shipping method visibility / restrictions
By default WooCommerce displays all of the shipping methods. However, some shipping methods may have restrictions for package sizes, weight or contents. In this case you will need to restrict visibility of shipping methods which can be done in three ways:
Weight classes, built-in functionality
Shipit shipping methods allows you to use weight classes pricing. The plugin doesn’t display shipping method after the highest weight class has been exceeded so it can be used as a simple weight restriction.
Free Conditional Shipping for WooCommerce plugin
Conditional Shipping for WooCommerce can be used to restrict shipping methods by products, measurements and many other rules. It’s a free open source plugin available at WordPress.org so please keep in mind that support is limited.
Conditional Shipping Pro, premium version of Conditional Shipping
Conditional Shipping Pro is a great choice for more complex shipping rules or large amount of products. It allows you to control shipping methods by product categories, shipping classes, measurements, coupons and many other attributes. It also comes with priority 1-on-1 support.
5. Shipping labels
Shipping labels are created in WooCommerce admin.
- Go to
WooCommerce > Ordersand open the order you want to create shipping label for - In the right side you can find the Shipit box. Select shipping method, enter weight and measurements and click
Create- Weight is calculated from the products
- Some of the shipping methods have dummy measurements which means you don’t have to enter correct package measurements. If the plugin provides measurements (e.g. 15 x 15 x 15 cm) after you’ve selected the shipping method, you can keep the measurements as is. In this case billing is based on only the weight.
- Shipping information is sent to Shipit and a shipping label created. Link to the shipping label and tracking can be found in the Shipit box.
5.1 Bulk printing of shipping labels
It’s also possible to create multiple shipping labels at once.
- Go to
WooCommerce > Orders - Select orders which you want to create shipping labels for
- Select
Create Shipit shipping labelsunderBulk actions - Enter weights and other shipment information
- Click
Create shipping labels - Shipping labels are created and they can all be printed in a single PDF
